
by Steven J. Owens (unless otherwise attributed)
I've been researching various knock-down furniture connector approaches for a couple years now. Most woodworking joints, mechanical connector or otherwise, are intended for permanent joints, so this is an odd topic. I'm by no means an expert, which is why I've been taking notes. Here they are.
So far, my favorite is the very historically period keyed mortise & tenon, aka "tusk tenon", but they're also the most work, so I'll explain that at the end, along with brief descriptions of various tools and approaches for the hardest part of the job -- making through mortise, aka holes through the center of wood.
However, there are a number of more modern options:
I'm going to try to link to examples of each connector, but since links can go dead, I'll also try to give a short description. Someday I'll take photos of all of these and add them to this article.
I'm not sure if there's a more technical term for them, but bed rail fasteners are a popular option and in fact it looks like a fair number of people in the SCA use them for thrones, and even beds.
Bed rail fasteners are available on sites like rockler or woodcrafters. They're bits of metal that hook together. You embed one in the end of a rail (via a shallow mortise) and another into the side of a post:

There's a version that doesn't require embedding/mortising, but those are significantly less robust than the mortised version.
I experimented a bit with bed rail fasteners but I found the ones that I tried weren't robust enough for uneven ground and lateral force. Maybe other people have had better success with different bed rail fasteners, or simply avoid using them on uneven ground.
I guess if you made one out of really thick, heavy steel, very large, it might do the job, but good luck finding that for sale.
I haven't looked into these in a few years, so it's possible there are better options on the market now. For example, I just googled on it and came across "Kasunen bed rail brackets". These appear to be non-mortise brackets but more substantial than the ones I tried.
A carriage bolt, also called a coach bolt or round head square neck bolt, is basically a long bolt with nut and washer, but the head of the bolt has a weird shape. It has a rounded dome over a four-sided square neck, then the main body of the bolt.
Note: I also recently learned of "elevator bolts", which seem very similar to carriage bolts, except that instead of a domed head, they have a flat head, that ends up being more flush with the surface.
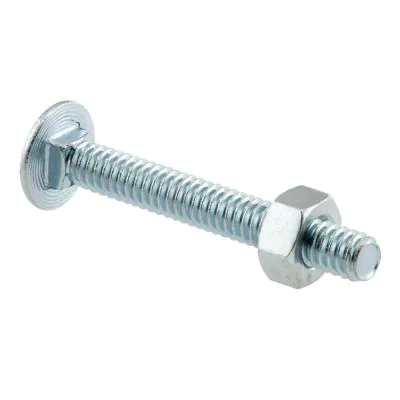
Carriage bolts are designed for the four-sided square neck to sink into the wood. The wood is what holds the head of the carriage bolt still and keeps it from spinning as you tighten the nut.
This makes the carriage bolt smooth and relatively attractive, just a shallow domed button on the surface of the wood. But a few moments thought will also point out that this makes carriage bolts not so great for repeated assembly and dismantling.
The best bet is if you just leave the carriage bolt embedded in the wood and only take off the nut and washer. Otherwise you end up risking chewing up the wood the neck is embedded in, or damaging the threads of the bolt so it becomes a pain to tighten the nut.
Another thing to watch out for in outdoor applications is that the bolt or the nut can rust and then be very hard to assemble/disassemble. You have three options, galvanized, zinc-coated or stainless steel. Galvanized is cheapest but the protection is a chemical coating that can easily get rubbed off. The other pros and cons you can google on yourself.
Another gotcha to watch out for is that some bolts and carriage bolts aren't threaded all the way up to the head. This is fine if your wood is thick enough that your nut never gets to the non-threaded part, but it's something to watch for.
If you still want to go the bolt-together route, steel hanger bolts are interesting. These look like somebody took a thick wood screw and a thick carriage bolt, cut off the heads of both, and welded the cut-off ends together.

Instead of drilling all the way through and shoving a carriage bolt through from one side and adding a washer and nut on the other, the hanger bolt is one half bolt, one half wood screw. You drill a pilot hole and then screw the wood screw half of the hanger bolt into the board.
To actually do the screwing, you use a pair of nuts or wingnuts. You put one on the end of the bolt, tighten it down a half inch or so. Then put on the second nut and tighten that down against the first nut, until the pressure of the two nuts against each other and against the threads keeps them from rotating. Then use those nuts to drive the wood screw half into the board.
If you're using wingnuts, you put the first wingnut on upside down, so the wings don't interfere with tightening the second wingnut against it.
Tee nuts and threaded inserts and barrel nuts are similar takes on the same idea, burying the nut in the wood to hide it. This link has examples of all three:
Embedded nut for using machine screwsTee nuts and threaded inserts require you to drill all the way through the board and then embed the fastener in the board from one side, and screw in the bolt from the other side. Barrel nuts are weirder, you drill two holes at a 90 degree angle, one to embed the barrel nut, the other for the bolt.
A tee nut is similar to a bushing, in that it's a little cylinder that's designed to be hammered into a hole in a board. It serves as an embedded nut.

The tee nut is threaded on the inside, like a nut. One end of the cylinder has a lip with little prongs.
You pre-drill a hole all the way through the board. You insert the tee nut into the pre-drilled hole, then gently hammer it so the little prongs bite into the wood. The prongs keep the tee nut stuck to the wood and keep it from rotating, and you can then screw a bolt into the hole from the other side.
This is a useful little video about installing tee nuts. I find the synthesized voice a tad annoying but the info is good and it has some good tips. One neat trick, instead of hammering the tee nut into the wood, use a bolt and washer to pull the tee nut into the wood from the other side:
T-Nut for Installing into WoodA threaded insert is more of an embedded nut. It's a cylinder with threading on the inside, and reverse threading on the outside.


You drill a hole for the bolt all the way through the board, then on the side that the nut would normally go on, you drill a slightly larger hole, as if for a countersink, and insert the threaded insert into the slightly larger hole.
Usually the outer end of the insert is designed to take a hex wrench, which you use to drive the insert into the wood. The external threading is the reverse of the internal threading, so inserting the bolt from the other side and tightening it doesn't unscrew the threaded insert.
This video both shows how to use threaded inserts and does some interesting compare and contrast:
this is the problem with threaded inserts - WoodcraftBySumanWhile I think this video is worth a watch, I'd be careful not to assume from it whether or not to use threaded inserts for your purposes. It's good information, but it's the beginning, not the end of your investigation.
In addition, some of the comments point out some useful details and limitations of his tests, like the comment by Pyromaniac2450:
"I think it's important to note that the style of insert used here is designed for softwood, and was used in hardwood. They do make another style of insert for hardwoods, I think it would be interesting to see how well those hold up"
Also HotSteel4140 comments:
"These results are as expected as a 1/4-20 bolt has 20 engaged teeth per inch (TPI). A 1/4-20 insert however has about 12 TPI. The inserts are NOT intended to give you higher torque capabilities. They are used when something needs to be disassembled and reassembled multiple times. If you would have removed the bare 1/4-20 bolts completely from their holes and rescrewed on your 100 screw in test, I think you'd of found them to be stripped within 10-20 or so times from slight cross threading each time. The inserts failed around 30 because when you bottom out the screw, it torques on those wooden threads and only pulls against a 12 TPI engagement to wood, as opposed to a 20 TPI engagement. Thread qty engagement matters allot with screws. The higher TPI, the higher the chance of cross threading when reassembling, but also higher the initial and repeated torque it can handle. But again, ty for the experiment."
A cross dowel barrel nut is a smooth cylinder with a threaded hole drilled in to its side.

The barrel nut is similar to a threaded insert, but the nut is installed by drilling a hole perpendicular to the bolt hole, similar to a cam lock (see below).
The end of the barrel nut has a slot for a flathead screwdriver, so you can turn the barrel to align it with the bolt hole. The smooth barrel nut slips into the hole. There's no threading or prongs to hold it in the wood, because it's not designed to resist force along its long axis. Once the bolt is tightened in from the side, it will hold the barrel nut in place.
I've seen a lot of cross dowel barrel nuts in furniture I've bought, but generally these seem intended to be assembled and then left assembled.
Also, I've seen comments here and there that seemed to imply that barrel nuts are considered mainly good for perpendicular joints, i.e. T-joints or L joints.
The wikipedia entry for sex bolts gives a whole laundry list of alternative names:
"sex bolt, binding posts, Chicago screws, interscrews, barrel bolts, barrel nut, partition screws, door closure bolts, furniture screws, panel fasteners, architectural sex bolts, arch series screws, hinge screws, display fasteners, screw nuts, connector bolts, threaded rivets, grommet nuts, post and screw sets, book screws, and stationary screws."The most useful term I've found to describe them is "sleeve nuts", because the nut part is indeed a sleeve, a relatively long metal tube that goes all the way through the material.

These are basically a nut and bolt where the nut part is a smooth cylinder almost as long as the bolt. The bolt doesn't go through the nut, instead the other side of the nut is designed to take a hex wrench, which you use to keep the nut from spinning while you tighten the bolt.
I'm not sure about sex bolts, I get the feeling they're more meant to be used with metal parts.
Ikea loves cam locks. A cam lock is kind of like a barrel nut, except that instead of a threaded bolt going into a threaded hole in the barrel, the rotation of the barrel part - the cam, in this case - is what's used to pull the two pieces together. The "bolt" isn't threaded, but the end has a slight mushrooming that the edges of the cam latch onto.

Note, if you google on cam lock you'll see a whole bunch of actual keyed lock mechanisms. Try adding "woodworking fasteners" to the search terms.
Ikea loves them, but have you ever tried to disassemble a piece of Ikea furniture to move them? I'm not sure I'd trust them to do the job.
Also, like barrel nuts, I've seen hints here and there that cam locks are mainly meant for T-joints.
I'm not sure if there are more generic, technical terms for these. Sash locks are somewhat like cam locks, in that they take advantage of rotational movement.
For toggle latches, I did find a really great video on the more general mechanical principle they work on, "over centre mechanisms", see below.
A sash lock is the ubiquitous latch you find on casement windows.
A toggle latch is the ubiquitous latch you find on toolboxes and footlockers.
Here's an example of a sash lock:

And another example:

I can't find a Creative Commons licensed image of a toggle latch, so you'll just have to search for yourself:
Toggle Latch Google Image SearchTechnically sash locks and toggle latches aren't meant for furniture purposes, but the principle of a sash lock is very similar to a cam lock, and I've thought they might be very useful for a variety of knockdown furniture purposes, especially in situations where I want to surface mount them, but keep them fairly flattish.
Like a cam lock, most sash locks work via the rotation of a flat cylinder sort of piece. Unlike a cam lock, the sash lock cylinder is partial and as it rotates it extends out of the fitting it's in and through an immobile fitting on the other side.
Terms I've seen for these and similar fasteners are are "swivel action lock", and "cam latch" (because they work similar to a cam lock).
"Butterfly twist latch" and "twist latch" are related terms also, for a sort of abbreviated casement latch where there's less of a full circle of material, though they work by a similar cam action. Here's one example, mainly I'm including it because this website looks useful as source for fasteners:
DIY Road Cases Store butterly latchA related, but simpler kind of fastener is a "screen turn latch" or "acorn turn latch" (I think acorn's a brand name). This is simply a piece of material an inch or so long with a pivot point in the middle. You put in a lid or something that's flush with the material the turn latch is mounted on, then swivel the turn latch so one end of it is holding the lid in place. I've seen the bit that swivels called a "turn button", so "turn button lock" might be a better search term; "turn latch" seems to get a lot of casement latches. I've also seen it referred to as a "flush clip".
And, updating the image links on this page just now, I also came across "coffin lock", which one product listing page says is also known as a "roto lock":
Musson.com Coffin LockAnd also "draw latch", though this product listing page seems to use it as an umbrella term:
Southco Draw LatchesToggle latches seem useful for a similar purpose, like keeping ther lid of a box on.
One thing I have not found and haven't figured out the right name or search term for is a toggle latch designed to go around corners. Imagine you have a flat lid, without an inch or two of lip to fasten the upper half of the toggle latch to. It seems like this should exist, and I can think of a few designs where that'd be really handy. Hm, that some of the draw latches at the southco.com link above look like they might be made to work for that.
This is a really great explanation of the mechanical principles that toggle latches work by, which he calls the "over centre mechanism":
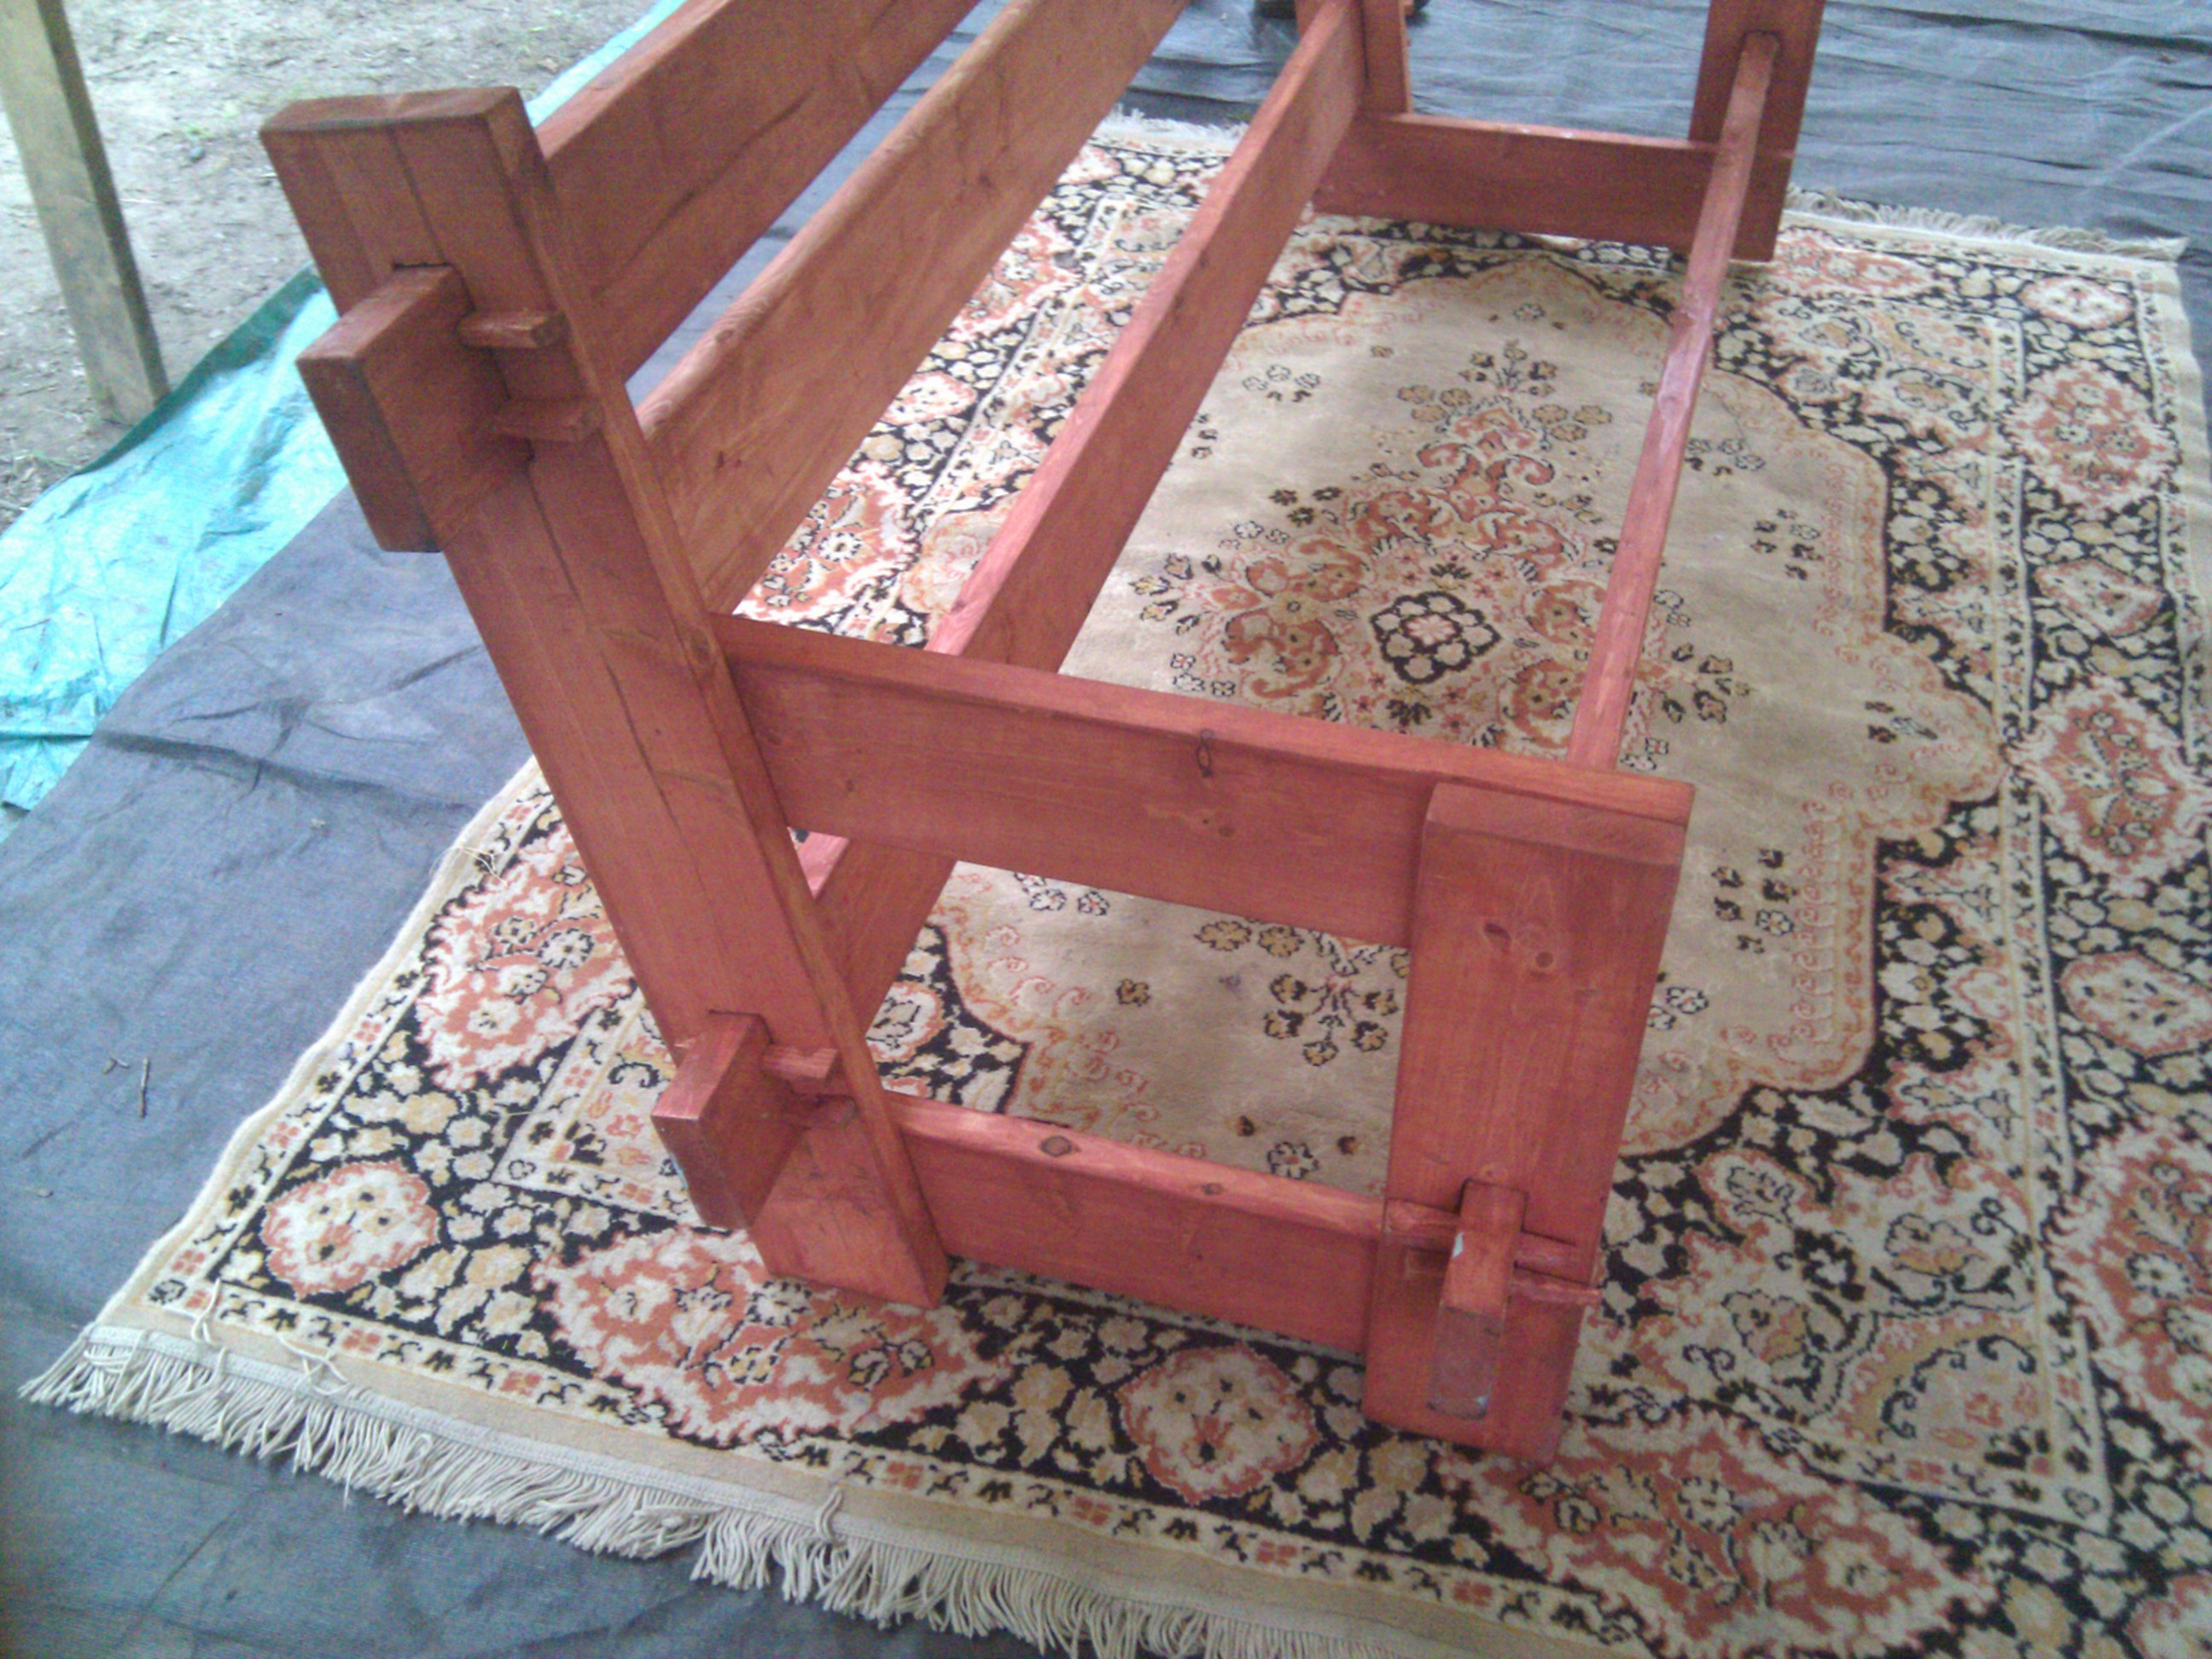
The classic example of which is the Oseberg viking ship bed and Gokstadt bed, which are what this Pennsic bench/couch I did is very, very loosely based on.
I have to give credit here to bloodandsawdust.com, where I first learned about tusk tenons.
Blood and SawdustHe has a great little PDF tutorial:
Blood and Sawdust Tusk TenonsI also have to give credit to two good friends, Angus and Mark, both talented and more knowledgable about woodworking than me. They gave me a lot of good advice and actual help on the projects I've done so far.
For my own purposes, I've used a double set of horizontal key mortises, instead of a single vertical mortise. As the PDF explains, if you're using horizotal key mortises, you need two to prevent the key mortise from becoming an axle that the wood rotates around.
I've actually begun to think that the double horizontal key mortise is better, for furniture for use at Pennsic or any similar situation where you can't be sure of flat ground. The double tusks mean you have a lot more flat, horizontal surface area between the tusks and the face of the primary tenon, which resists wracking force caused by uneven ground.
I also suspect you can get away with a much looser primary mortise, which is a good idea if you're going to try to knock this thing back apart after two weeks of rain and sun. I haven't done any experimenting on that idea, however. Yet.
I'm describing this mainly to head off confusion. A lot of people refer to the tusks as "wedges", but in fact there's a very different joint called a "wedged mortise & tenon".
I can kinda see why people get confused about this, the tusks are, in fact, wedge-shaped. In fact, when I googled on "wedged mortise & tenon" just now to to find the example link below, the fourth result was in fact a keyed/tusk tenon.
Language is more complicated than people realize: humans are a contradiction, simultaneously lazy and sloppy with language while insisting on neat, unambiguous categories and clear, unchanging definitions.
So I'm mentioning it here so you don't see a reference to wedged morties & tenon and get confused.
Wedged mortise & tenons are a permanent joint. In a wedged mortise & tenon you cut slits into the end of the tenon, insert the tenon into the main mortise, and then pound thin wedges into the slits to expand the end of the tenon:

Hey neat, there's a "blind" wedged mortise & tenon, called apparently a Mortise Fox Tail. In case it's unclear from the diagram below, you start the wedgs into the their slots, then slide the tenon-plus-wedges end into the blind mortise. As you hammer the tenon in with a mallet, the back of the blind mortise forces the wedges into the slots in the end of the tenon, expanding the tenon and locking it into its tapered, blind mortise.

Just recently, a skilled and talented friend posted a video on Facebook about restoring an antique door, which included having to chisel out the wedges from the wedged tenon joint. So I guess a wedged tenon isn't really permanent :-).
Here's his facebook page, check it out, he has a bunch of super cool videos:
Edward D. Pinto, Sculptor, architectural restoration.I think this is all of the door restoration videos from that project:
Edward D Pinto: Beginning the restoration of a set of double parlor doors in an 1880s 2nd empire.Edward D Pinto: These are wedged mortice and tenon doors.Edward D Pinto: Disassembled the door.Edward D Pinto: Planing the extra wood off.Edward D Pinto: It's a door again.Edward D Pinto: Got the 2nd door of the set disassembled...Edward D Pinto: Reassembling 2nd the door.Moving back to keyed mortise & tenon aka tusk tenons.
Important to note is that in a keyed mortise & tenon, the secondary mortise, called a "key mortise", is slanted on one side, and uses a wedge or "tusk" instead of a dowel pin. That slant makes the joint tighten up as you pound the tusk in further.
If you're planning to use this for knockdown furniture for SCA camping, I have some suggestions learned through experience. After several days to a week or two outdoors, the wood may swell and the tusks may need a little "convincing" to come out. Therefore:
Make the tusks out of a good hardwood so they can stand up to the abuse of being hammered out.
Make sure the thin end of the tusk is cut off a little blunt, at least 1/4" to 3/8" thick, again to make it easier to hammer it out if it gets too tight.
Make and bring several spares of the tusks, you're going to get some lost, or broken.
Bring a wooden or polyurethane mallet to knock the tusks out.
Bring a scrap of 2x4 to place against the thin end of the tusks and then hit the 2x4 scrap with the mallet (or even a regular metal hammer or small sledge). This will protect the tusk and also protect the rest of the furniture.
Cutting the huge mortises for this kind of furniture can be a chore, however. There are a few approaches, which I'll summarize here:
I've only done a few of these, but here are my notes from researching them.
The two most frequent recommendations I heard from woodworkers were using a router, or using the drill-and-chisel method.
I did the couches using the drill-and-chisel and it worked, but was tedious, especially if you're making a piece of furniture with 8 or more huge mortises.
Note: Even if you don't want to do the drill-and-chisel method, check the note about drilling out key mortises, at the end of that section.
I'm planning on trying the router approach. The router is the defacto standard for modern, hobby woodworkers to cut mortises, but it's pretty clear that that 99.99% of modern, hobby woodworking mortises are a) very small mortises, like 1/2" by 1/2" or even smaller, b) blind mortises, c) meant to be glued together for permanent joints.
Abraham Lincoln spent his youth cutting down trees and is famously quoted as saying something like "Give me an hour to chop down a tree and I'll spend the first forty-five minutes sharpening my ax."
If you use any of the methods involving a chisel, learn to sharpen your chisel. This is a deep rabbit hole, so don't go too far down it (hobby woodworkers are total geeks about sharpening stuff) but also don't use some bench chisel that hasn't been sharpened in twenty years.
In general, for almost all approaches, there's an issue with "tear out", meaning that when the tool breaks through from the opposite side, the wood at the surface of the work piece doesn't cut cleanly.
There are two very standard tricks that people use, that somewhat reduce tearout, which are a) pre-cutting the top layer of fibers on the opposite side, using a utility knife or the like, and b) putting a layer of blue tape on the opposite side (which is really just a minimalist version of the sacrificial board approach, below). I've tried the first a little, it does help, but it's not perfect, and doesn't seem to work that well for really big mortises.
Plunge-cutting from both sides is one approach to avoid tearout. This means literally cut to slightly over half-depth from one side, then flip the board over and cut from the other side. However, this means you need to get the cuts lined up exactly right. More on that below.
A sacrificial board is more common fix, because it's easier, especially with power tools. You clamp a thin board to the underside. This board holds the surface wood of the work board in place, and the tear out occurs in the sacrificial board instead. Then you just throw away the sacrificial board when you're done.
This is pretty much what it sounds like. Use a drill, ideally a drill press, along with a Forstner bit, to drill out the bulk of the mortise. The result is a round hole, of course, or several adjacent round holes. Then use a typical wood chisel (with beveled sides, often called a bench chisel) to chisel that hole square.
This can work, but for a large number of really large, really deep mortises, the chiseling adds up to a fair bit of work. I've only done a few of these:
The approach worked, but they weren't easy and they weren't super clean. Part of it may have been that I didn't know how to properly sharpen my wood chisel. Part of it may have been that I was using cheap pine with fairly uneven grain. Also, I've noticed that in a lot of the videos I've seen online, they tend to orient the mortise so the long side is parallel to the grain.
Note: When I did the twelve 4" x 1.5" mortises, by the time I got finished chiseling out all of those and had to do the the key mortises, I was tired and decided to cheat/be sloppy. I was cutting the tusks/wedges from 1/2" thick boards, so I just used the drill press to drill the key mortise as two overlapping holes that made an oval, and instead of squaring off the key mortise, just used a belt sander to round off the upper side of the tusks. This worked out fine.
Note: I've seen a few examples where people used the drill press almost like a router, plunging all the way and then sliding the board back and forth. I'm not sure how well this works. I've been told that drill presses aren't designed for that sort of lateral stress; that's the major difference between a drill press and a router. Also, this requires being able to move the board. This risks going off kilter with the board, or worse having the drill throw the board at you.
Most woodworkers use a router for simple, small (compared to our needs) mortise & tenons for permanent furniture joinery. Here's a good intro from the Wood Whisperer.
The two big gotchas with a router are a) it will have rounded corners the same size as the bit, and b) most routers can't plunge very far and that makes it of limited usefulness for mortising all the way through a 3x3 or a 4x4.
The rounded corners of a routed mortise are basically going to be the size of the router bit. Standard woodworker router mortising is essentially done with a bit the same width as the mortise. You want a mortise 1/2" wide, you use a 1/2" bit, and the ends will be a 1/2" diameter semicircle.
For the big mortises I'm talking about, you'd have to move the router in a circle. I don't have much router experience, but experienced woodworkers seem to dislike that approach. Maybe because it's just slower, or harder to get accurate, and of course they almost never do mortises that big. Here's an example of that from the Wood Whisperer. The actual routing happens about halfway through the video (4:49) but the whole thing is well worth watching:
Note, bits significantly larger than 1/2" seem hard to find (and expensive), and even harder to find in long lengths for the drill-and-plunge trick (see below). Plus they're going to require a lot more physical effort, and may require a higher horsepower router (which may in turn require more strength, or shallower passes).
Even if you use a 1/4" bit, you're still going to have rounded 1/4" corners. Also note that cutting a large mortise with a 1/4" bit is going to take twice as long as with a 1/2" bit.
An option is to use the bigger bit for the initial work and then clean up with a smaller bit. This means two separating routing tasks, of course, and time swapping the bits out, or using two routers so you can just put one down and pick up another.
Also note that you can't just plunge all the way in and then route sideways. Generally all sources say you should start shallow and make many passes, increasing the plunge depth maybe 1/4" for each pass. This, of course, takes more time.
You can avoid the limited-plunge-depth problem a couple ways. The "plunge" feature of most routers seems to almost always be an add-on case or sleeve that the router bolts into. Mostly they just don't plunge that deep (but see lock mortisers, below).
An option I've considered (and the Samurai Carpenter thinks it's a good idea, and he seems way more competent than me), is to avoid using the plunge mechanism at all. Instead, first drill a hole all the way through with a drill press, then get a very long bit, 2" or 2.5" long, lower it into the pre-drilled hole, then turn the router on:
Note, a related idea that is applicable to this approach is to use both a top-bearing and bottom-bearing bit, see "Plunging from Both Sides", below.
As I said above, most sources say you should make multiple shallow passes, so I'm not sure what the risks or downsides to this approach are. The Samurai Carpenter is usually pretty clueful... but that may be exactly why somebody like me, with lesser skills, shouldn't try this at home.
Even with drill-and-plunge, you still won't be able to plunge all the way through a 3"x3" or 4"x4" post. You can plunge from both sides, but this requires a lot of accuracy to make the two holes match up cleanly.
Approaches, I'm told, include a) a lot of skill and patience, b) a very good template jig setup, c) a neat trick using two different bits, a top-bearing and bottom-bearing bit.
I don't have a lot of skill, so I'm leaning towards b) or c) :-).
For b), there are a brazillion commercial, super-complicated jig contraptions and homemade template/jig designs.
One useful google search term is "lock mortiser". These gadgets are like jig/clamp plus plunge housing on steriods, just add router. They're neat and maybe a great solution, but just the gadget (not including router, bit, etc) can be $900-$1500. Here's one example, I think that's a Virutex FC16s, around $1500:
Here's the blog post that the maker of the above video did about it:
Tools of the Trade: Repurposing a Lock MortiserOption c), the top/bottom bearing bit approach, is a neat hack.
Some bits come with a bearing, basically a rotating ring around the base of the bit. You can press the bearing along your guide edge or template, and the rotating bearing rolls along the guide edge of template as you move it. The bearing keeps the shaft of the bit from digging into the edge of the guide or template.
What I described above is a "top-bearing bit", where the bearing is on the end of the bit that's close to the router itself. This is apparently the much more common version.
There's also a type called a "bottom-bearing bit", where the bearing is on the end of the bit away from the router. The usual purpose of bottom-bearing bits is to enable you to put the template on the underside of the work piece and get a cleaner cut, as explained here:
Fine Woodworking: Use a Bottom-Bearing Bit For Template RoutingIn this video from MM Wood Studio, he marks both sides and uses a drill press to remove the bulk of the wood (which I think is a good idea), then removes a little more bulk with a chisel, then clamps a template to it and routes it clean with a top-bearing bit.
He makes the first plunge to more than halfway through. Then, when he flips the work piece over and does the plunge from the opposite side, he switches to a bottom-bearing bit, which then guides along the the already-cleaned-up mortise, so the opposite side matches perfectly:
A pantograph is a framework where you have two pens or whatever, and as you move one, the other moves in correspondence. You can use it for writing or drawing two images simultaneously, or for tracing an image, using a pointer instead of a pen in one of the spots. You can also design it so the traced image is much larger.
Some stuff I've seen suggests that tracing images like that was one of the early uses for pantogrpahs. I also remember seeing pantographs used to engrave nameplates and the like at chain stores at the mall, as a kid.
Pantographs have been popular for use with woodworking routers for decades, but recently this insane - and insanely-skilled - Canadian woodworker, Matthias Wandel, build a really nifty pantrograph router that he calls the Pantorouter:
Wandel sells plans for a modest fee (around $20 last I looked, might be more now):
If you do have a CNC, the best way to build the pantorouter is with a table saw."Somebody made (with Wandel's permission) a machined, metal version of the pantorouter and sells it for $1400. It looks awesome, but a little too pricey for me:
Hybrid (metal) Panto Router ShopChain mortisers are basically a chainsaw version of a plunge router, or perhaps more accurately "lock mortiser type jig meets chainsaw".
I've heard these have a long history in Japan, and I've read that they're used a lot for timber framing. But I've also read forum comments saying that US timber framers don't like or use them because the mortises they cut are too rough. I don't know who to believe :-).
Here's an example:
And here's another one that goes through the whole timber framing joint process:
In this one the Samurai Carpenter goes over a (small) chain mortiser in more detail:
This is the period approach, and from what I've seen it may be - with sufficient practice, good tight-grained wood, and a properly sharpened chisel - one of the most cost-effective and fastest, cleanest ways to chisel out a mortise.
As I said above, language and terminology is a lot sloppier and more disorganized than most people assume. If you start digging into what is the precisely right term, it's a deep rabbit hole, or more of a rabbit warren, because often there's no right answer. In fact, just googling now for examples of the chisels I'm about to describe led me to all sorts of conflicting explanations. So take the following with a large grain of slat.
Most woodworking chisels you'll encounter are not mortising chisels.
The most common chisel is a bevel-edged chisel, often called a "bench chisel" because it's used for many different purposes, so it's almost always on the workbench.
The classic English mortising chisel is often described as a "pig sticker", because seen from the side it looks somewhat like a single-edged blade. Very often the sides are wider than the top/bottom, it has an almost square cross-section. It is not beveled at all, and in fact the very wide, square sides are part of what makes it work, they keep the chisel aligned in the mortise as you chop it. The thicker design also makes them stronger and more suited for prying wood out of the mortise. See the Franz Klausz videos below for an example.
In between there's something I've heard called a "registered chisel", and googling just now, some people call them "sash mortise chisels". They're not beveled, they have square sides like a pig sticker chisel, but the sides are not nearly as thick. One explanation I read for why "registered" is that the flat sides, like the flat sides of the pig sticker chisels, keeps the chisel aligned in the mortise.
Note, one requirement of the traditional approach is that the mortise width must match the mortise chisel width. So if you want to 1.5" mortises, you'll have to find a 1.5" mortising chisel. That's not easy or cheap... and it's also much harder to chisel those, see the "Drawbacks" section below.
I can't find the video right now, but I'm pretty sure it was one of Paul Sellers' videos on chisel sharpening (he has several) where he mentioned an interesting tidbit; the square edges of the mortising chisel should be sharpened also, because they're designed to cut the wood fibers as you hammer the chisel in. This makes more sense after you watch the technique in the following videos.
I saw a great video of Frank Klausz, hand-chopping a mortise in a piece wood up against a plate of glass:
Here's Frank Klausz another video, the sound quality isn't as good and there are no/few closeups:
Klausz also has an instructional DVD that's pretty good. I think this is it:
Amazon: Making Mortise-and-Tenon Joints: with Frank KlauszPaul Sellers did a version of this demo with better camera quality, and also does another one with a beveled-edge chisel:
Here's the Pete Follansbee video that Paul Sellers mentioned in the above video:
While we're at it, there's nothing revolutionary in this video, but it has some good closeups and tips on wood chiseling in general:
One gotcha with this approach is that in every example I've seen, the long dimension of the mortise is parallel with the grain of the wood. Assuming I get enough practice at both sharpening chisels and mortising, I'm not sure how well it would work cross-grain.
Another issue is that this approach works pretty well for relatively narrow mortises, like the kind used in modern woodworking for permanent mortise & tenon joints. For huge tusk tenon joints, not quite so easy.
I've been told by skilled woodworkers that the amount of force on the chisel required scales up non-linearly; cutting a 1" wide mortise requires far more than merely double the force required for a 1/2" wide mortise.
And in fact, it may be that historically they didn't use this method for really larger mortises, they may have used a version of the widely-recommended modern approach of drilling first and then hand chiseling.
I haven't even begun to do anything resembling real historical research on this topic, but:
First, some googling turns up claims that the brace and bit came into widespread use in Europe in the 1400s, although certainly the underlying principles had been known for centuries prior to that, in China.
Second, one of my favorite youtube series, "Smarter Every Day", in episode 186 he has a fake beam made for his house, from reclaimed lumber (link below). The reclaimed lumber guy says the hand-hewn beam he's getting is from 1840s to 1880s (at 3:20 in the video). The beam has large mortises cut into it, and when they cut the big slot out of the beam (to fit the modern beam they're hiding) you get a closeup (at 7:34) of the bottom of the mortises, which show marks from where they drilled it out with Forstner bits.
The whole video is neat, and it's only 11:32 long, but if you're in a hurry:
At 2:58 the reclaimed lumber guy says they've picked out some hand-hewn beams for Destin. He points out how to identify how the beam was cut via the circular saw marks of the 1905-1910 era beams.
At 3:20 he shows the ax marks from hand-hewn beams (at 3:20) and says they're from 1840s to 1880s beams.
At 4:01 he talks about the large mortises and tenons, including a part at 4:18 about the original wooden peg used to peg the that tenon in place.
At 7:34, after cutting the slot in the old beam, the bottoms of the big mortises are exposed and you can see the forstner bit marks.
A hollow chisel mortiser is a lot like a drill press, except that there's a long box of metal around the drill bit, and the edges on the end of that box are sharpened and act as chisels.
Unlike most drill presses, instead of a circular handle, hollow chisel mortisers use a long lever handle, to give you leverage. That's because the chiseling action is pretty much just brute force. Nothing clever going on here.
Still, lots of woodworkers use hollow chisel mortisers. Then again, most of them aren't cutting huge, through mortises.
Here's a video of basic hollow chisel mortiser operation:
These monsters cost upwards of $12,000 for a used one and require 3-phase power, but they're awesome.
A swing chisel mortiser moves a chisel back and forth laterally, at very high speeds, as it gradually plunges.
These are the machines that they use to route out door lock mortises in a factory that manufactures doors. Here's an example. Note, you get a better angle to see how it actually cuts around 2:28:
I'm still looking for some good information on these two topics. What I suspect from experience is that neither one really matters that much, but I'd like to have more information from a more authoritative or even scientific source.
Since I'm talking about things like size, width, etc, I'll note in passing that the most frequent recommendation I've seen is that the mortise width should be about 1/3 the width of the board, i.e. if you're mortising through a true 3x3, the mortise should be 1" wide. Now back to tenon shoulders and mortise looseness.
A tenon is the end of the board with a chunk cut away on both sides. The bit where it widens back out to original dimensions is called the "shoulder". That's the part of the tenoned board that presses against the mortised board (the shoulder presses against the board on either side of the mortise).
By the way, the etymology of mortise and tenon are both surprisingly murky, or maybe it's not that surprising, given how old woodworking is.Tenon comes from the old french tenir or tenere, meaning to hold, which is also the root for "tenet". One source said it might come from the proto-indo-euroepan root "ten-", to "stretch", as in to stretch your mind around a concept.
Mortise comes from french "Old French mortaise (13c.), possibly from Arabic murtazz "fastened," past participle of razza "cut a mortise in." Cf. Spanish mortaja."
A lot of examples have shoulders on all four sides, i.e. the tenon part of the board is narrower than the rest of the board in both width and thickness. Obviously the shoulders on the face (the wide side) of the board have to be pretty shallow.
So I've mostly just skipped the shallow shoulder on the face, and just cut the deep shoulders. Nominal 2x6 boards are actually 1 5/8" x 5 5/8", so I end up with the tenon part being 1 5/8" x 3.5", and only two shoulders, each with 1 5/8" x 1 1/8" of area.
I used to be worried about how or whether the mortise and tenon would resist lateral stress, aka "wracking force". I worried that I didn't have shoulders on all four sides. In my first big mortises, I cut a shallow secondary mortise that the shoulders socketed into a little.
After some experience, observation and thought, I strongly suspect all of that is unnecessary. The two 1 5/8" x 1 1/8" flat shoulders, pressing against the flat of the 2x6 they're going through, provide more than enough resistance to lateral force.
Similarly, I used to be worried about making mortise and tenon fit tightly.
A lot of the woodworking info out there harps on this. But then again, most of that info is about making permanent, glued mortise & tenon joints. Those joints don't have the key mortise & wedge to make sure it's tight. And boy can it be a pain in the ass getting that tenon through that tight mortise - or out, after two weeks in the outdoors humidity.
So, again, I've begun to strongly suspect that the joint doesn't really need - or rather, doesn't absolutely depend on - the reinforcement of having a tight fit between the tenon and mortise. Sure, all things considered a tight fit is probably better than a loose fit, but is it enough better to justify the difficulty it adds to assembling and disassembling?
I still need to do some systematic experimenting to figure out just how loose you can get away with. Or preferably find somebody else's results from doing all that hard work.
Unfortunately, the obvious phrase "loose fit", or "loose tenon" is used to refer to an approach where you put a mortise in both sides of a joint, and then use an entirely separate, third piece as the tenon that goes into both mortises. This makes researching this topic difficult. Another term for this same thing is "floating tenon", so why the hell they had to use up a whole separate useful phrase is beyond me :-).
This page is, again, aimed at permanent M&T joints, but I'm including the link because of the fun acronym CTSBTF, "Cut to size, beat to fit" :-).
Mortise & Tenon PrimerThis is a nifty video that strength-tests a tusk tenon joint. Turns out the face of the post fails before the tusk or the tenon does.
Will Myers: Tusk Tenons, How Strong Are They?Below are some notes and video links on a related topic, wood strength and glue joint strength.
While these are interesting in their own right, they're relevant here because they shed some light on one aspect of tusk tenon joint strength. I don't think it'll have a huge impact on how you should design these joints. When you have a tusk tenon joint, you have a big tenon that extends past the big mortise and has a secondary mortise, aka key mortise, where the tusk or key is inserted. The end of the tenon obviously goes further than just the key mortise. I don't know of a name for that end bit of the tenon, but the length of that bit determines the wood's ability to resist splitting from the pressure of the tusk. The amount and length of lignin there is to bind the wood fiber together determines its resistance to splitting. If you find it splitting, you need to make the end bit of the tenon longer.
Note that cross lapped joints, aka halved joints, are significantly more susceptible to failure from this problem. A halved joint is where you cut matching notches in two boards and slot the boards together at the notches:

This sort of joint is pretty popular for building knockdown furniture in SCA and other cicles, although most often they're made with plywood, which is a bit more resistant to splitting because of the structure of the layers of plywood, which rotates the grain for each layer.
The summary of the summary is:
Recently a guy named Patrick Sullivan posted some youtube videos where he did some quantitative testing on wood glue joints to determine the strength of different joints (links below). This caused a little bit of a stir, as it contradicts some popular beliefs about glue joints, and some other popular youtube woodworkers posted video replies, some of which were misunderstood, so they posted followup clarifications. TL;DR, all the cool woodworkers think Patrick Sullivan is pretty cool.
The videos are worth watching, but they're bout 10 minutes long, and gauging from the reactions people had when they were posted, a lot of the really interesting data and conclusions were somewhat buried. So here's the TL;DR:
His main original goal was testing the commonly repeated belief that end grain glue ups are weaker. His conclusion is that in terms of end grain holding the glue, or whatever, they absolutely are not weaker than (and this is important) 1) a similar surface area joint 2) with a similar amount of force applied. However, end grains joints tend to have smaller surface area than side grain joints, and end grain joints tend to be subject to more leverage. Also, many types of end grain joints, for example any kind of picture frame joint or mitered joint, are more finicky to cut right, leading to risk of gaps, etc, that can prevent a solid glue joint.
5:24: Yes, in fact the wood does tend to fail before the glue does (5m24s in the first video).
The fibers are about twice as strong as the lignin is.
5:56: End grain to side grain glue ups are actually stronger than side grain to side grain glue ups, but only a little. And the break always happened on the side-grain, probably because it was breaking the lignin, not the fiber.
6:42: End grian to end grain glue ups are twice as strong, on average, as side grain to side grain glue ups. In this case the glue joint failed instead of the wood, but at much higher load.
9:52: Out of curiosity, he also cut some boards twice as long, i.e. no glue joint at all, and tested the load required to break them. Great chart here showing breaking loads for "lignin strength" (i.e. no glue joint, grain is parallel to the load), glue strength, and long grain strength (grain is perpendicular to the load). Note, the chart is in hundreds of kilograms.
10:00: This is where everybody should start, because it seems like a lot of people fell asleep by this point and missed the point of the video. Not only does this point in the video have a great chart showing breaking loads for "lignin strength" (i.e. no glue joint, grain is parallel to the load), glue strength, and long grain strength (grain is perpendicular to the load). He also sums up the big picture takeaways. Note, the chart is in hundreds of kilograms.
And unbroken boards are about ten times as strong as any glue joint.